
Gawr Gura Quest for Bread Boss fights in Quest for Bread
Read arenas before you swing the trident.
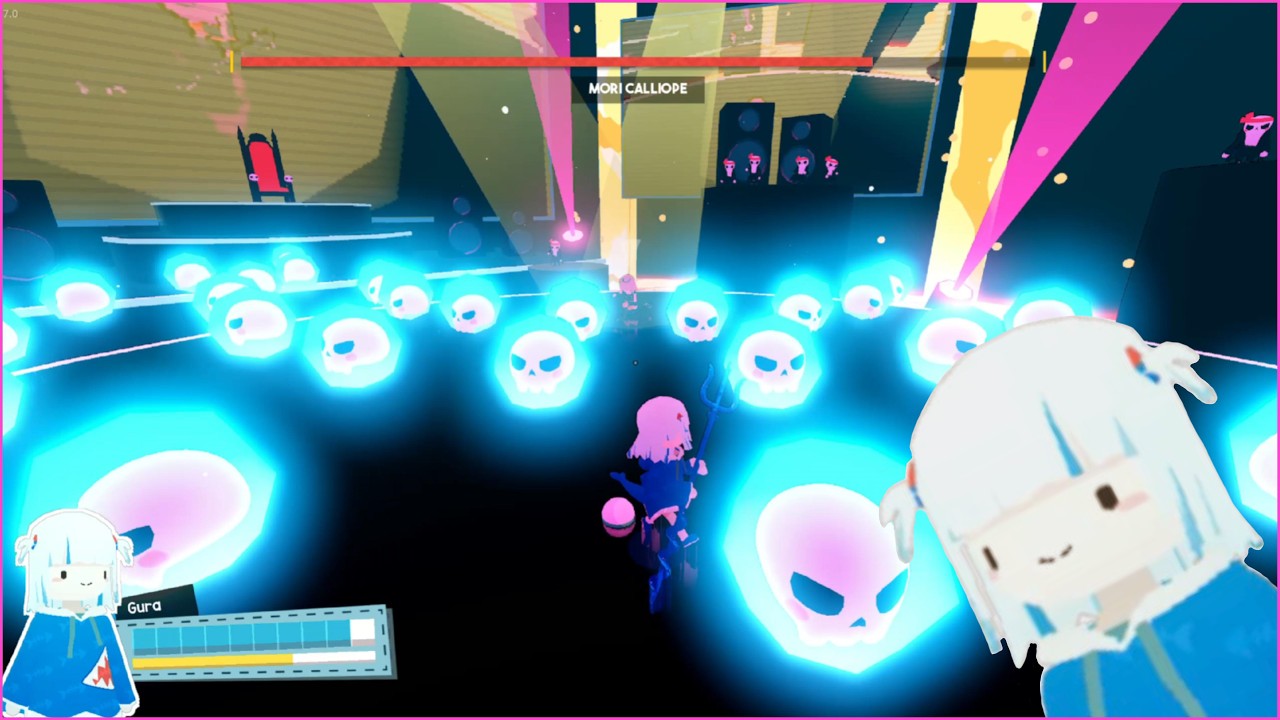
Steam sells unique, challenging boss fights. Public footage names at least one: a concert floor of cyan skull platforms, pink light columns, a red throne, and a health bar labelled Mori Calliope while Gura’s portrait HUD stays in the corner. That fight is the template for how this wiki talks about bosses. It is not a hallway with extra HP.
Arena first, DPS second
Quest for Bread combat is simple on purpose. The difficulty is the floor. If the floor is magma, the exam is jump timing from How to Play. If the floor is a crowd of glowing skulls, the exam is camera plus patience. Watch one full telegraph cycle before you commit a trident string. Save at the door. The game allows save-anytime; use it.
Calliope’s room is loud. Skulls sit in packs. Lasers or light columns occupy vertical space. A named bar at the top is your permission to stop thinking about hats. If you came here from the hat guide, leave. Cosmetics wait.
Myth faces are not all bosses
A dialogue scene puts Gura, Amelia, and Ina on a torii platform talking about interdimensional pickles. That is rest, not a health bar. Steam promised Myth cameos. Only treat a cameo as a boss when a named bar or a locked door says so. The walkthrough flags those gates without spoiling every line.
Practical rules
- Enter, camera behind Gura, confirm the named bar is visible.
- Do not attack during a full-screen tell. Simple melee still loses to a laser you walked into.
- If the cyan HUD bar is low, leave optional platforms alone.
- After the kill, turn around. Boss rooms hide hats.
- Rank the night in the boss tier list once you have died enough to be honest.
Demo gameplay in the middle of this page includes the Next Fest boss slice. The full 27 August 2026 campaign has more unique fights than that clip. When a new palette plus a locked door appears, assume a test, not a corridor. Then go back to the Guides Hub or into speedrun mode if you now know the arena by heart.
Reading the Calliope screenshot like a tutorial slide
The concert floor is packed. Cyan skulls sit in rows with angry faces. Pink light columns occupy the air Gura would like to jump through. A red throne sits empty on a raised stage. Speakers and silhouettes line the back wall. A thin red bar labelled Mori Calliope sits at the top. Gura’s chibi portrait, name, cyan bar, and yellow bar stay in the corner. A larger Gura face even peeks from the right edge of some captures. That is not a hallway with extra HP. That is an exam of camera plus patience.
Enter with the cyan bar healthy. Do not spend yellow on a spin you do not need. Watch one full telegraph cycle before a trident string. If the named bar leaves the screen, stop attacking and fix the camera — the settings helper exists for that. After the kill, turn around once for a possible A-tier hat, then leave. Rank the night honestly in the boss tier list. Other unique fights will use the same rule: new palette plus a locked door equals study, not a corridor. Steam promised more than one. Public footage currently names this one in letters you cannot miss.
Dialogue cameos stay out of this ranking. The torii pickle scene with Amelia and Ina is rest. Enjoy it, pick the trident up mentally, and walk. Then return to the Guides Hub or the walkthrough for route context.
Frequently Asked Questions
Quick answers for first-time shark pilots and 100% hunters.
Is Calliope in the full game?
Footage of the fight exists with a named bar. Treat her as a real encounter, and expect other unique bosses as Steam advertised.
Should I use hats in boss fights?
Not until you can clear the arena without them. Cosmetics are for after, per the hat guide.
Where is the difficulty ranking?
The boss tier list ranks encounter types after you have samples.